Tackling Home Renovations
 Plumbing Projects...
Remodeling a kitchen or a bathroom is exciting, and most homeowners get a thrill out of turning something old into something new. But any project you take on will require planning, and sometimes you'll run into unexpected surprises. Okay all the time, you'll run into unexpected surprises. Here are some things to consider.
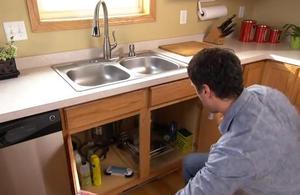
The first temptation of many homeowners is to move the location of major fixtures. But while tossing out your old kitchen sink is easy, moving it to a new location is not. Your hot and cold water supply lines, your drain and your vent line are all embedded in the wall. Moving these to a new location can cost a lot of money. If it's in your budget, your contractor can make it happen - but you need to consider whether it's worth the expense.
If you're considering replacing your cabinets there's a good chance that you'll need a new floor as well, since your flooring may not extend underneath your existing cabinets. So, unless the new cabinetry has exactly the same footprint as the old, include a new floor in your budget. And be sure the person you hire for cabinet and flooring measurements is qualified. Because if those measurements are wrong, it could mean the sink and refrigerator won't fit like they should.
Then there are the hidden surprises lurking behind your walls. Open them up and you may find things you weren't expecting, like leaky pipes, dry rot, mold, even termite damage (here's some information from wikipedia about dry rot). This is actually good news, because you've found the problem before it gets any worse. And surprises happen in almost every remodel or renovation- there's s just no way to account for everything.
Remodeling can be rewarding, but be ready for a few bumps along the way. Being prepared emotionally and financially helps keep your stress level down as you head towards your goal. Just keep reminding yourself that you're adding value and investing in your home. Good luck!
Tips For Selecting a Good Contractor

We've all heard horror stories about untrustworthy contractors, and sadly, they do exist. But there are a lot of very good contractors out there - who are committed to quality construction and good customer service. How do you pick a winner? Here's a list to help you out.
First, ask for a copy of the company's license. And be sure to verify that the license is in good standing. Keep in mind that certain states or provinces don't require licensing if the job is under a certain dollar amount.
Second, get proof of insurance. Ask the company to provide a copy of their insurance certificate. And verify with the insurance agency or carrier that the policy is still in good standing.
Third, check multiple references. HomeAdvisor.com is a great place to start, with over 800,000 verified reviews of service professionals written by real customers. Then ask the professional for additional references. Angie's List is another very popular online resource that many find very helpful.
Fourth, finalize the contract before starting on a project. Make sure the contract is signed and dated and make multiple copies.
Finally, write your payments only to the company that was referred and avoid paying with cash. A check or credit card will provide you with a record of the transaction, and ensure the money ends up in the right place. Be sure to get receipts for all payments. And don't make your final payment until you're completely satisfied with the project.
Reputable contractors will recognize this as standard procedure, and it's the best way to ensure a happy ending. Good luck with your project!
Repair Refrigerator Ice Makers
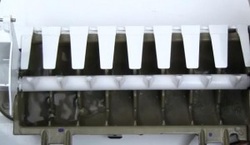 Repair Refrigerator Ice Maker
This is how you fix the ice maker on your refrigerator without needing to call in professional refrigerator repair service. If you are not sure if you can do it or not… sure you can it’s pretty easy, all we are going to need is a ¼ inch nut driver, and maybe a pair of needle nose pliers, and maybe a flat blade screw driver, let me show you how it’s done.
The very first step we need to do before we begin the repair, is to disconnect the power supply, and you turn off the water supply to the refrigerator. The ice maker is located in the upper left hand corner we’ll remove the ice bucket out of the way, there’s one ¼ inch hex edge screw in the bottom side of the ice maker that needs to be removed, and there are two that are located above the ice maker on the left wall that just need to be loosened.
Once we have loosened the two top screws, we can remove the bottom one, and gently lift up on the ice maker, tilt it away from the wall, and pull it towards you. Along the film tube, loops through the hole in to the reservoir, and exposing the wire harness connector at the back, lift up on this tab, on the wire harness, and separate it.
Next step we need to do is to transfer the shut off belt on the old ice maker, and install it on our new one, to do that, put it in the off position, to sit down position, just slide the back end of the hole and gently pull it out of the front end, now we can set that aside to install on the new one.
Now your ice maker kit probably came with several different wire harnesses, select the one that matches the harness that is on the existing ice maker, and if there isn’t one, remove the harness from your old ice maker, disconnect it, we need to remove the front of the ice maker, gently pull it forward, and we’ll expose the retaining clip that holds the harness to the ice maker head, take a flat blade screw driver, and just gently press in on that, press the tab pull the harness back in.
There’s a locating rib on this end of the harness to make sure that it goes in properly. Next step will be to install proper wire harness on to the ice maker, make sure the locking tab is pointing out, securely snap it into place, install that in the clip, and the harness is ready to connect.
Next we need to put the bale on the new ice maker, locate the long end, which goes to the front, make sure the slot is pointing down, slide it in, pop it back in. It should lock in the upright position, or off position, and fall free.
Next we’ll reconnect the wire harness, this harness will only go one way, make sure it’s firmly clamped in, now we need to locate the water fill tube, through the hole in the back of the ice maker, and tuck it up on to the mounting brackets, the ¼ inch screw that we secure the bottom with, reinstall that, if the ice maker is level, re-tighten all three screws, and our repair is complete.
That’s just how easy it was to change the ice maker in your refrigerator! Good luck with your repair.
This helpful article was found posted on the Best Refrigerator Repair, Atlanta website
More articles and helpful information to come here soon. Check back to this page and/or our Home Helper Blog page.
